Rechargeable hearing aids
We offer rechargeable hearing aids for our patients who are
unable to use battery-powered hearing aids, for example those with
severe dexterity or visual impairment. To see which model you have,
please check either your battery card, individual care plan or your
hearing aids.
Operating your hearing aids
Turning your hearing aids on/off
To turn the hearing aid off, firmly press the bottom button
until you see a red light (should be about 3 seconds). To turn the
hearing aid on, long press the bottom button until you see a green
light.
Please note: The hearing aid automatically
turns on when removed from the charger.
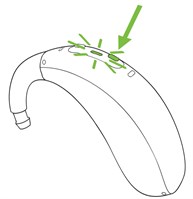
Left & right hearing aid markings
There is a red or blue marking on the back of the hearing aid.
Red marking is for the right hearing aid and blue marking is for
the left hearing aid.
On your earpiece, there will also be a marking in blue or red.
Please ensure the colour of the marking on your earpiece matches
the colour of the marking on your hearing aid.
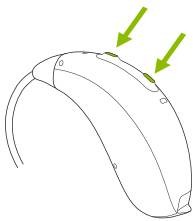
Volume control and programs
Depending on how your audiologist has set up your hearing aids,
you may have a volume control and/or programs added.
You should see two buttons on your hearing aids. A quick press
of the top button turns the volume up. A quick press of the bottom
button (button closest to the battery door) turns the volume
down.
You might have programs on your hearing aids if the audiologist
has added them. To change the program, hold down the button (for at
least 3 seconds or longer) until you hear a beep. One beep is
program 1, two beeps is program 2 and three beeps is program 3. If
programs have been added, your audiologist would have advised you
on what programs are on your hearing aids. Many patients opt to not
have any programs and only have a volume control, as the hearing
aids can automatically adjust its settings to optimise the sound
quality in its environments. If you would like a
telecoil loop program added, please contact the Audiology
department.
If you opted to keep things simple at your fitting appointment,
your hearing aid may have been set to fully automatic mode, which
does not require you to press any buttons.
Please note that if you lose your hearing aid there may
be a cost of £95 per hearing aid to replace and £120 for the
charger.
How to charge your hearing aids
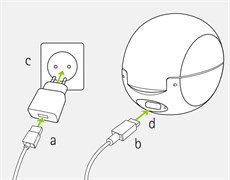
Preparing the charger - Connecting to the power supply
a) Plug the larger end of the charging cable into the power
supply.
b) Plug the smaller end into the USB port on the charger.
c) Plug the power supply into a power outlet.
d) The indicator light is green when the charger is connected to
the power supply.
Important note: Only use the charging cable
that the Audiology department has provided as other cables can
cause a fire risk.
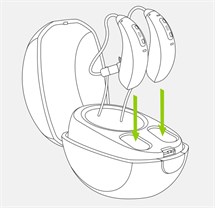
Using the charger
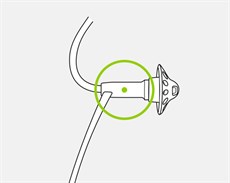
1. Insert the hearing aid into the charging slots. Make sure the
left and right hearing aid markings match the left (blue), right
(red) indicators next to the charging slots. The hearing aids will
automatically be muted when inserted into the charger.
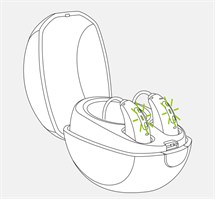
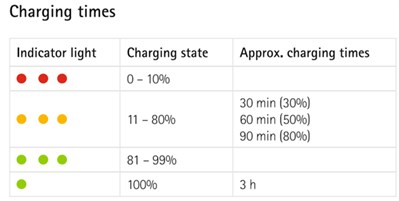
2. The indicator light will show the charging state of the
battery until the hearing aid is fully charged. When fully charged
the indicator light will be solid green.
3. Remove the hearing aid from the charger by first pulling the
hearing aid gently toward yourself then lifting it out of the
charger.
Note: Please do not hold the tube to remove the
hearing aid from the charger as this can damage the tube.

When the charger is connected to the power supply, the hearing
aid switches on automatically when removed from the charger.
The charging process will automatically stop when the batteries
are fully charged, so the hearing aid can be safely left in the
charger. It can take up to 3 hours to charge the hearing aid. The
charger can be closed while charging.
Useful instructional videos
1. How to insert the hearing aid for:
An open fit hearing aid
A moulded hearing aid
2. How to clean the hearing aid for:
An open fit hearing aid
A moulded hearing aid
Connecting to bluetooth devices
1. Click on Settings icon
2. Click on Bluetooth tab
3. Turn hearing aids off and on again (this puts them into a
pairing mode for 3 minutes)
4. On phone, select "pair new device" - some phones will
automatically start searching for new devices
5. When the hearing aids are found, it will only connect to one
of them, usually the right, as it streams over to the other side -
the name of the device should include the name of the hearing aid
(it will not be a random string of numbers and letters)
6. Click on the device - a message will appear asking if you
wish to pair the hearing aid, click "pair"
How to connect to your iPhone video
How to connect to your Android video
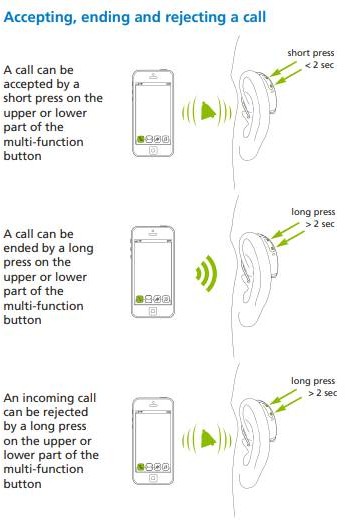
Phone calls
How to connect to the 'MyPhonak' app
- Install the app from the App Store .
- On your smartphone open the app and click "Next".
- Walk through the "welcome screens".
- Read and "Accept" the Privacy Notice.
- If you like, you can share usage data with us. Find more
details in the Privacy Notice of the app.
- Make sure that Bluetooth is enabled on your iPhone.
- Reboot the hearings aids by following the instructions in the
app.
- Tap "Continue" to search for the hearing aids.
- The app will start searching for the Phonak hearing aids.
- Once they are found, tap "Select."
- Allow some time for the app to connect to both hearing
aids and confirm the action for each hearing aid in the
dialog.
- After the hearing aids are connected tap "Ok".
- Once completed you'll see a confirmation screen and will
be automatically redirected to the main screen.
MyPhonak app video
If you have lost pairings or having problems with App:
• Delete the app
• Go into the Bluetooth settings menu and delete all pairings to
the hearing aids
• Restart the phone
• Open the Bluetooth settings menu and pair to the hearing aids
(this will just pair to one of the aids) but it establishes the
connection we need for call streaming
• Then reinstall the app
• Restart both hearing aids and pair both in the app
If you still have issues, please check the Support Section of
the Phonak website: https://www.phonak.com/en-uk/support
Additional Resources
Nova PR Full User Guide
Nova PR Simple Slimtube Guide
Slimtube Cleaning & Insertion Leaflet
Nova PR Simple Earmould Guide
Bluetooth Guide for Phonak hearing aids


